Tuesday, January 29, 2013
Command Prompt பயன்படுத்தி கோப்புகள் மற்றும் கோப்புறைகள் மறைக்க தந்திரம்
Trick to hide files and folders using Command Prompt
The most important thing is that, once hidden with this method, the files/folders cannot be viewed by any search options even if you click "Show All Hidden Files and Folders".
Hiding the most wanted files and folders is very important nowadays and it's really a tedious job too. In order to make this tedious job an easy one, i'm going to deliver you a the trick now.
For Example: You have a folder named "photos" and this folder is stored in (Disk Drive E). You think that it should not be seen by strangers who use your PC.
For that you need to follow the following instructions
Press windowkey+R: Run command dialog box appears.
Now type "cmd" and hit enter. A command prompt window displays.
Now type "attrib +s +h E:\photos" and hit enter.
The folder "collegephotos" will be hidden (Note: It cannot be viewed by any search options)
(To view this folder again, use the same command but replace '+' with '-' on both flags 's' and 'h')
Friday, January 25, 2013
Android மொபைல் D.N.S அமைப்புகளை பதிவிறக்க
Free and simple tool to set DNS settings on the fly.
IMPORTANT: REQUIRES SUPERUSER (ROOTED PHONES)
Press [MENU] to configure automation so the selected DNS settings will stick throughout connectivity changes.
Select to only automate on 3G or WIFI connections.
DNS list updates on startup, if internet connectivity is available.
Note that some Internet Service Providers restrict access to certain resources via DNS requests. If unable to access said resources, please try turning off automation and reconnecting to 3G first.
IMPORTANT: REQUIRES SUPERUSER (ROOTED PHONES)
Internet access permission is required to download the latest list of DNS providers for quick selection via the dropdown list.
Use DNS 8.8.8.8 for amazing speed
download
MS-Word விசைப்பலகையை பயன்படுத்தி இந்திய ரூபாய் சின்னம் தட்டச்சுவது எப்படி? DownloadRupee எழுத்துரு
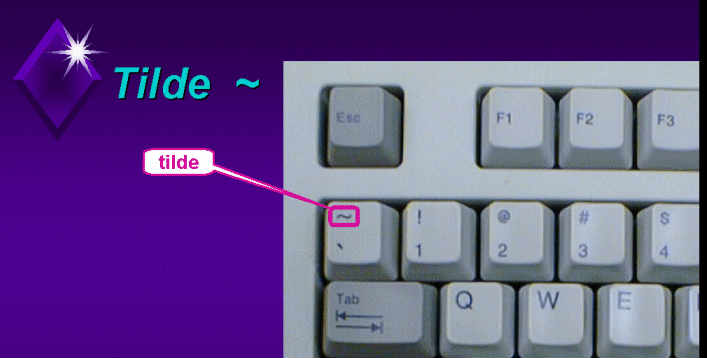
After the Official Symbol for the Indian Rupee was finalized by the Union Cabinet, every one in the country were curious about "How to Type Indian Rupee Symbol in Computer using MS-Word?". So i thought of sharing this small tutorial on writing INR Rupee Symbol using computer keyboard.

The symbol of Indian Rupee doesn’t have a Unicode character and it can take from a few days to a year for the new symbol to get accepted by the Unicode Consortium's Unicode Technical Committee that is responsible for the development and maintenance of the Unicode Standard, including the Unicode Character Database.
Until then, you can use the Indian Rupee font designed by Foradian Technologies using (`) key of the keyboard.
How to install Rupee font?
1. Download the Rupee.tff file
2. Copy the file to C:\Windows\Fonts directory.(for Windows XP users)
2. Right-click the file and choose “Install”. (for Windows 7/Vista users)
NOTE: As all the computers all not having this font installed, It is advised not to use this font in your documents such as MS-Word and other applications. Because, when you open such a document on another computer the viewer will not be able to see the symbol as the font is not installed on his computer. The Rupee font is strictly for designing purposes.
Foradian Technologies has also released Vector, EPS, Photoshop and Illustrator files for the Rupee symbol which are free to use.
Wednesday, January 23, 2013
எந்த மென்பொருள் இல்லாமல் 20% இணைய வேகத்தை அதிகரிப்பது எப்படி?
எந்த மென்பொருள் இல்லாமல் 20% இணைய வேகத்தை அதிகரிப்பது எப்படி?
Increase internet speed by 20% without any software –
Microsoft reserves 20% of your available bandwidth for their own purposes like Windows Updates and interrogating your PC etc. By unreserving this bandwidth, you can make your internet connection faster. By 20%. The steps to do so are –
1. Click Start then Run and type "gpedit.msc" without quotes.
2. Then go to Local Computer Policy>Computer Configuration>Administrative Templetes>Network>QoS Packet Scheduler. Click on QoS Packet Scheduler. In the right side , find Limit Reservable Bandwidth and double click on Limit Reservable Bandwidth.
3. It will say it is not configured but the truth is under the ‘Explain’ tab. Select ‘Enable’ and set reservable bandwidth to zero.
4. Click on ‘Apply’ and your internet speed will boost up by 20%.
5.restart your PC..
Tuesday, January 22, 2013
கூகிளின் பிறந்தநாள் பரிசு - Birthday Doodles
 இன்று காலையில் எப்போதும் போல கூகிள்
இணையதளத்திற்குச் சென்றால் அதன் Doodle வித்தியாசமாக இருந்தது. Google
Doodle என்பது அதன் முகப்புப் பக்கத்தில் அந்த நாளில் ஏற்பட்ட முக்கிய
நிகழ்வுகளையோ / முக்கிய நபர்களைப் பற்றிய விசேசங்கள் எதேனும் இருப்பின்
அவர்களைக் கொண்டாடும் வகையில் ஒரு சிறப்புப்படத்தினை கூகிளின் லோகோவுடன்
இணைத்து வெளியிடப்படுவதாகும்.
இன்று காலையில் எப்போதும் போல கூகிள்
இணையதளத்திற்குச் சென்றால் அதன் Doodle வித்தியாசமாக இருந்தது. Google
Doodle என்பது அதன் முகப்புப் பக்கத்தில் அந்த நாளில் ஏற்பட்ட முக்கிய
நிகழ்வுகளையோ / முக்கிய நபர்களைப் பற்றிய விசேசங்கள் எதேனும் இருப்பின்
அவர்களைக் கொண்டாடும் வகையில் ஒரு சிறப்புப்படத்தினை கூகிளின் லோகோவுடன்
இணைத்து வெளியிடப்படுவதாகும். மிகுந்த கற்பனைத்திறனுடன் உருவாக்கப்பட்ட படங்களை வெளியிடுவதால் இதனை ரசிப்போர் அதிகம். சரி இன்றைக்கு என்ன முக்கியத்துவம் என அறியலாம் என்று ஒரு ஆர்வத்தில் மவுசை படத்தின் மீது நகர்த்தினேன். அந்த செய்தியைப் படித்ததும் தான் மறுபடியும் படத்தை உற்றுநோக்கினேன்.
அழகான விதவித வடிவத்தில் கேக்குகள், சாக்லெட்கள், மெழுகுவர்த்திகள், கிப்ட் பேக் என்று அமர்க்களமாக இருந்தது. அட! இன்று எனக்குப் பிறந்த நாள். "Happy Birthday Ponmalar" என்ற செய்தியுடன்.Wow, I really enjoyed this. இதை எல்லாம் கூகிள் எனக்குத் தராவிட்டாலும் பிறந்த நாளுக்காக இப்படி Doodle அமைத்தது என்னை அதிகமாக உற்சாகப்படுத்தும் வண்ணம் அமைந்தது. Thats why Google No.1 in the user friendly search engine. இணையத்தில் தேடலின் போது கூட அழகான தருணங்களை சில நேரம் நண்பர்களைத் தவிர்த்து தளங்களும் தரமுடியும் என்பதற்கு கூகிள் ஒரு உதாரணம். அதனாலேயே கூகிள் எதிலும் முண்ணணியில் இருக்கிறது என்பதில் சந்தேகமில்லை.

வருடம் முழுவதும் பலரின் முக்கியத்துவத்தை Doodles ஆக பார்த்து வரும் உங்களுக்கு, உங்கள் பிறந்த நாளுக்கென்று விசேசமாக Doodles போட்டு உங்களை மகிச்சிப்படுத்துவது தான் Google Birthday Doodles. இந்த விசயத்தைப் பற்றி எற்கனவே அறிந்திருந்தாலும் அந்த நாளில் வரும் போது தான் ஒரு சந்தோசமே. உங்களுக்கும் பிறந்த நாளில் இதனைப் போன்று Doodles வரவைக்க பிறந்த நாளை உங்கள் கூகிள் பிளஸ் புரோபைலில் Google Plus Plus ->Edit Profile கிளிக் செய்து அப்டேட் செய்து கொள்ளுங்கள்.

பயர்பாக்ஸ் உலவியை கூகிள் குரோம் போல மாற்றும் நீட்சி FxChrome
 இணைய
உலகில் அதிகம் பேரால் விரும்பப்படும் பயன்படுத்தப்படும் உலாவியாக
பயர்பாக்ஸ் இருந்து வருகிறது. ஆனால் கூகிள் வெளியிட்ட குரோம் உலவி தற்போது
இதற்கு சவாலாக வந்து கொண்டிருக்கிறது. இதன் வளர்ச்சியும் அபரிதமாக உள்ளது.
பயர்பாக்ஸ் ரசிகர்களையும் மெல்ல மெல்ல இழுத்து பயர்பாக்சின் இடத்தைப்
பிடிக்கும் வாய்ப்பு உள்ளதாக பேசப்படுகிறது. குரோமின் வளர்ச்சிக்குக்
காரணம் அதன் எளிமையான வடிவமைப்பும் அதன் வேகமும் தான். ஒரே கணிணியில்
எத்தனை உலாவிகளை வேண்டுமானாலும் பயன்படுத்தலாம் என்பது வேறு விசயம்.
இணைய
உலகில் அதிகம் பேரால் விரும்பப்படும் பயன்படுத்தப்படும் உலாவியாக
பயர்பாக்ஸ் இருந்து வருகிறது. ஆனால் கூகிள் வெளியிட்ட குரோம் உலவி தற்போது
இதற்கு சவாலாக வந்து கொண்டிருக்கிறது. இதன் வளர்ச்சியும் அபரிதமாக உள்ளது.
பயர்பாக்ஸ் ரசிகர்களையும் மெல்ல மெல்ல இழுத்து பயர்பாக்சின் இடத்தைப்
பிடிக்கும் வாய்ப்பு உள்ளதாக பேசப்படுகிறது. குரோமின் வளர்ச்சிக்குக்
காரணம் அதன் எளிமையான வடிவமைப்பும் அதன் வேகமும் தான். ஒரே கணிணியில்
எத்தனை உலாவிகளை வேண்டுமானாலும் பயன்படுத்தலாம் என்பது வேறு விசயம்.பயர்பாக்ஸ் உலவியைப் பயன்படுத்துபவர்கள் குரோமின் இடைமுகத்தை விரும்பினால் அதற்கு ஒரு நீட்சி உள்ளது. இதன் பெயர் FxChrome. இதனை பயர்பாக்ஸ் உலவியில் நிறுவினால் பயர்பாக்ஸ் குரோமின் தோற்றத்தைப் போல மாறிவிடும். மெனுக்கள், டேப்கள், விண்டோக்கள், பட்டன்கள் போன்றவை குரோமில் இருப்பதைப் போல தோற்றமளிக்கும். ஆனால் நீங்கள் பயர்பாக்சில் தான் இருப்பீர்கள்.
பயர்பாக்சும் வேண்டும். குரோம் போலவும் வேண்டும் என வித்தியாசமாக நினைத்தால் உங்களுக்கு இந்த நீட்சி பயன்படும். ஆனால் இதனைப் போட்டு விட்டு குரோம் போல வேகம் வரவில்லை என்று சொல்லக் கூடாது. முக்கிய குறிப்பு என்னவென்றால் இந்த நீட்சி பயர்பாக்ஸ் பதிப்பு 4 இல் தான் செயல்படும்.

தரவிறக்கச்சுட்டி: https://addons.mozilla.org/en-US/firefox/addon/fxchrome/
தரவிறக்கியதும் Install Now கொடுத்து நிறுவுங்கள். பின்னர் பயர்பாக்ஸ் உலவியை ஒருமுறை Restart செய்தால் பயர்பாக்ஸ் உலவி குரோம் போல மாறியிருக்கும்.
BSNL 2G லிருந்து 3G க்கும் 3G லிருந்து 2G க்கும் மாறுவது எப்படி?

BSNL நிறுவனத்தின் 3G இணைய சேவையை பயன்படுத்த புதிய சிம் 180 ருபாய்க்கு வழங்கப்படுகிறது. இதில் 120 ருபாய்க்கு அழைப்புக்கான பேலன்ஸ் மற்றும் 200 Mb டேட்டா அளவுக்கு இணையப் பயன்பாடும் தரப்படுகிறது.
BSNL 2G -> BSNL 3G
உங்களிடம் ஏற்கனவே BSNL 2G சிம் இருப்பின் அதிலிருந்து அப்படியே 3G சேவைக்கு மாறிக் கொள்ள முடியும். முதலில் உங்கள் மொபைல் போனில் 50 ருபாய் பேலன்ஸ் இருக்க வேண்டியது முக்கியம்.
பிறகு உங்கள் 3G மொபைல் போனிலிருந்து கீழ்க்கண்டவாறு குறுந்தகவல் அனுப்ப வேண்டும். அனைத்தும் பெரிய எழுத்துகளில் இருக்க வேண்டும். (Capital Letters)
M3G –> 53733
சிறிது நேரத்தில் 3G க்கு மாறப் போவதை உறுதி செய்யும் குறுந்தகவல் உங்கள் மொபைலுக்கு வரும்.
பின்னர் மறுபடியும் M3GY என்று 53733 க்கு பதில் குறுந்தகவல் அனுப்பவும். குறைந்தது ஒரு மணி நேரம் கழித்து 3G சேவை ஆக்டிவேட் செய்யப் பட்டதற்கான வாழ்த்துகள் குறுந்தகவல் வரும். உங்கள் மொபைலை சுவிட்ச் ஆப் செய்து ஆன் செய்து விட்டு பார்த்தால் மொபைலில் 3G சேவைக்கான சிக்னல்கள் தெரியும்.
BSNL 3G -> BSNL 2G
உங்கள் மொபைலில் 3G தேவையில்லை, 2G சேவையே போதும் என்று நினைத்தால் அதற்கு கீழ்க்கண்டவாறு குறுந்தகவல் அனுப்பவும்.
M2G -> 53733
மறுபடியும் ஒரு தடவை Confirmation Message வந்தவுடன் கீழ்க்கண்டவாறு குறுந்தகவல் அனுப்பவும்.
M2GY -> 53733
பின்னர் உங்கள் சிம் 2G க்கு மாற்றப்பட்ட செய்தி வந்தவுடன் சுவிட்ச் ஆப் செய்து பயன்படுத்தவும். ஏதேனும் சந்தேகம் இருப்பின் 1503 என்ற எண்ணுக்கு தொடர்பு கொள்ளவும்.
Monday, January 21, 2013
விண்டோஸ் REGISTRY BACKUP எடுத்து பின் மீண்டும் RESTORE செய்வது எப்படி?
கீ போர்டில் WINDOWS கீயை அழுத்தி பிடித்த படி R கீயை அமுக்கவும். இப்பொழுது தோன்றும் RUN WINDOW வில் REGEDIT என்று டைப் அடித்து ENTER செய்யவும்.இப்பொழுது REGISTRY EDITOR விண்டோ ஓபன் ஆகும்.

FILE ஐ கிளிக் செய்து EXPORT ஐ செலக்ட் செய்யவும்.

ரெஜிஸ்ட்ரி கோப்பைக்கு ஒரு பெயரை கொடுத்து அதை எங்கே சேமித்து வைப்பது என்ற வழித்தடத்தையும் கொடுத்து
OPEN என்பத்தை க்ளிக் செய்யவும். இப்பொழுது ரெஜிஸ்ட்ரி FILE BACKUP ஆகிவிடும்.

BACKUP ஆனதை மீண்டும் RESTORE செய்ய.
கீ போர்டில் WINDOWS கீயை அழுத்தி பிடித்த படி R கீயை அமுக்கவும். இப்பொழுது தோன்றும் RUN WINDOW வில் REGEDIT என்று டைப் அடித்து ENTER செய்யவும்.இப்பொழுது REGISTRY EDITOR விண்டோ ஓபன் ஆகும். அதில் FILE ஐ கிளிக் செய்து IMPORT ஐ செலக்ட் செய்யவும்.

இப்பொழுது BACKUP FILE சேமித்த இடத்திற்கு சென்று சேமிக்கப்பட்ட ரெஜிஸ்ட்ரி பைலை தேர்வு செய்யவும். பின் OPEN என்பதை க்ளிக் செய்தால் மீண்டும் பழைய ரெஜிஸ்ட்ரி RESTORE ஆகிவிடும்

Friday, January 18, 2013
Right Click Editor - தேவையற்ற மெனுக்களை மறைக்கும் மென்பொருள்!
வலது கிளிக் பதிப்பாசிரியர் மென்பொருளானது பயனர்கள் தங்களின் வலது கிளிக் பின்னணி மெனுவிலிருந்து தேவையற்றதை நீக்க அல்லது மறைக்க உதவும் ஒரு சூழல் பட்டி பதிப்பாசிரியர் கருவியாகும். விண்டோஸ் 7 பயனர்கள் விழுத்தொடர் மெனுக்கள், விரும்பத்தகாத உள்ளீடுகளை நகர்த்த அனுமதிக்கிறது. மேலும் பயனர்கள் நீக்க அல்லது சூழல் மெனுவை கிளிக் செய்யவும் அங்கேயே இருந்து தேவையற்ற ஷெல் நீட்டிப்புகளை மறைக்கவும் முடியும்.

வலது கிளிக் பதிப்பாசிரியர் பயனர் சூழல் பட்டியில் கட்டளைகளை சேர்க்க மற்றும் மாற்ற அனுமதிக்கிறது.
தேவை: மைக்ரோசாப்ட் டாட்நெட் ஃப்ரேம்வொர்க் 3.5.
download right click editor
இந்தியாவின் முதல் 1Gbps இணைய இணைப்பு ..
India's first 1Gbps Internet connection...

Google, launched its 1000mbps (1gbps) at kansas city (US), a leading techn incubator in US, as part of the Google Fiber Network. and Now, it is India's turn to get this speed.
Kerala, India's first telecom company incubator now has a new 1Gbps connectivity, Startup village of Kochi has become the second place in the world, after Kansas city of US.
Start up Village aims to build the elements of a world class tech ecosystem to realize the dream of a Silicon Coast in INDIA.
you can download a two-hour HD movie in 30 seconds or view 1080p video in YouTube at this lightning speed/
அண்ட்ராய்டு ரகசிய குறியீடுகள் ..
Android Secret Codes....
Cell Battery, WiFi Usage etc Info *#*#4636#*#*
Restore Factory Settings *#*#7780#*#*
Format Phone *2767*3855#
Launch service mode *#*#197328640#*#*
Test WiFi *#*#232339#*#* or *#*#526#*#* or *#*#528#*#*
Display WiFi MAC address *#*#232338#*#*
GPS test *#*#1472365#*#*
Other GPS test *#*#1575#*#*
Bluetooth test *#*#232331#*#*
Display Bluetooth physic address *#*#232337#*#
Start Gtalk monitoring *#*#8255#*#*
PDA, Phone, H/W, RFCallDate *#*#4986*2650468#*#*
PDA and Phone *#*#1234#*#*
FTA SW version *#*#1111#*#*
FTA HW version *#*#2222#*#*
PDA, Phone, csc, *#*#44336#*#*
Packet Loopback *#*#0283#*#*
LCD test *#*#0*#*#*
Melody test *#*#0673#*#* or *#*#0289#*#*
Device test such as vibration and lightness *#*#0842#*#*
Display touchscreen version *#*#2663#*#*
Touchscreen test *#*#2664#*#*
Distance sensor test *#*#0588#*#*
Display memory version *#*#3264#*#*
Saturday, January 12, 2013
நீங்கள் இன்னும் அதிகமாக சம்பாதிக்க வேண்டுமா ?
உங்களுக்கவே இந்த தளம் இங்கு சென்று விளையாடலாம்.
முதலில் வேலை என்ன என்று சொல்லி விடுகிறேன் .
1. உங்களுக்கு என்று தனி gmail-id உருவாக்கி கொள்ளுங்கள். ( ஏற்கனவே இருந்தாலும் பரவ இல்லை, இந்த வேலைக்கு என தனியாக உருவாக்கிக் கொள்வது நல்லது)
2. இந்த தளத்தில் பதிவு செய்த பின்பு, உங்களுக்கு என தனி கணக்கு வழங்க படும். அதில் தினமும் அதிக அளவில் செய்திகள் வரும் .
3. இதை நீங்கள் படித்து பார்த்து, அதில் கூறி உள்ளது போல் செய்ய வேண்டும்.
4. கடினமாக இருக்காது. கிளிக் செய்வது , வேறு ஒரு தளத்தில் பதிவு செய்வது போன்ற சுலபமான வேலைகள் தன இருக்கும்.
5. நீங்கள் பிரித்து பார்க்கும் செய்திக்கு ஏற்ப உங்களுக்கு பணம் வழங்கப்படும்.(0.25, 1, 2, 3, 5 ரூபாய் )
6. இதை உங்கள் நண்பருக்கு அறிமுக படுத்தினால் அதற்கும் பணம் தான் .
7. நீங்கள் தினமும் இந்த வேலை செய்து வந்தால் உங்களுக்கு மாதம் 4000 ரூபாய்க்கு மேல் சம்பாதிக்கலாம். நீங்கள் இதே வேலை மட்டும் செய்தால் 9000 வரை சம்பாதிக்கலாம்.
பணம் உங்கள் வீடு தேடி வரும். சில ஆதாரங்கள் ...........


மேலும் இந்த தளத்தில் உங்கள் கணக்கை இலவசமாக தொடங்கலாம்.
வேலை செய்ய ஆர்வம் உள்ளவர்கள் இங்கே உங்கள் கணக்கை தொடங்கலாம்.
இந்த வேலை மிகவும் சுலபம் , அதோடு பணம் வந்து விடுகிறது.
இந்த தளம் உங்களுக்கு கண்டிப்பாக உதவும்
Friday, January 11, 2013
தமிழ், சிங்களம் உட்பட 22 மொழிகளுக்கான Unicode "Task Bar" லேயே..!! Google இன் புதிய வசதி..
ஒரு சந்தர்பத்தில் இணையத்தில் தமிழை காண்பதென்பதே பெரும் கஷ்டமாக இருந்தது
அப்படி இருந்தாலும் முழுமையாக இருப்பதில்லை சில இடங்களில் கட்டம் கட்டமாக
தெளிவற்று இருக்கும்.
தமிழை தட்டச்சு செய்ய பலரும் பல வழிகளை பயன்படுத்துகின்றனர். என்றாலும் Google தரும் அருமையான சேவையினை அதிகமானோர் அறிந்ததில்லை.

காலத்துக்கு காலம் தனது புத்தம் புதிய சேவைகளை உலகுக்கு அறிமுகப்படுத்திக்கொண்டேயிருக்கும் Google, பயனர்களுக்கு சிறந்த சேவைகளை வழங்குவதில் முன்னோடியாக திகழ்கின்றது.

Google வழங்கும் Google Input Tools மூலம் கணனியின் எந்த ஒரு இடத்திலும் தமிழ், சிங்களம் உட்பட 22 மொழிகளில் எவ்வித சிரமமுமின்றி தட்டச்சு செய்ய முடியும்.
உதாரணமாக Face book இல் Status Update இடுவதற்கு, நண்பர்களுடன் அரட்டை
அடிப்பதற்கு, தேடு இயந்திரங்களில் தகவல்களை பெற்றுக்கொள்வதட்கு, வலை
தளங்களில் கருத்துக்களை இடுவதற்கு, நண்பர் உறவினர்களுக்கு தெளிவான E-mail
ஒன்றினை அனுப்புவதற்கு, கோப்புக்க ஆவணங்களுக்கு பெயரிடுவதற்கு என
அடுக்கிக்கொண்டே போகலாம்.
கீழே கொடுக்கப்பட்டிருக்கும் இணைப்பு மூலம் சென்று அங்கு வரிசை
படுத்தப்பட்டிருக்கும் 22 மொழிகளில் உங்களுக்கு தேவையான மொழி(களை)யை
தேர்ந்தெடுத்து "I agree to the Google Terms of Service and Privacy
Policy." என்பதில் ஒரு Tick Mark ஐ இட்ட பின் Download Button ஐ அழுத்தினால் ஒரு சில நிமிடங்களில் Google Input Tools உங்கள் கணனியில் நிறுவப்பட்டு விடும்.

பிறகென்ன Task Bar இன் வலது மூலையில் நீங்கள் தேர்ந்தடுத்த மொழிகள்
இருக்கும் உங்களுக்கு தட்டச்சு செய்ய தேவைப்படும் மொழியை தெரிவு செய்து
தட்டச்சு செய்ய ஆரம்பியுங்கள்.

நீங்கள் தொழில்நுட்பம் என தமிழில் தட்டச்சு செய்ய வேண்டுமெனின் தமிழை
தேர்ந்தெடுத்த பின் tholilnutpam என தமிங்கிலம் மொழியால் தட்டச்சு செய்தால்
"தொழில்நுட்பம்" என மாறிவிடும், மேலும் மொழித்தெரிவை மாற்ற Win Key +
Space Bar ஐ பயன்படுத்தலாம். இது தவிர Task bar இருக்கும் Google Input
Tools ஐ சுட்ட வரும் Language Preference என்பதன் மூலம் எமக்கு தேவையான
மொழியை Task bar க்கு கொண்டுவரவோ அல்லது Task bar இலிருந்து அகற்றி விடவோ
முடியும்.

தரவிறக்க கீழுள்ள இணைப்பில் செல்லவும்.
Thursday, January 10, 2013
Photoshop க்கு போட்டியான இலவச முன்னணி மென்பொருட்கள்
Photoshop பற்றி அறியாதவர்கள் எவருமில்லை. Photoshop இன் புதிய Version C7 விரைவில் வெளியாக உள்ளது. Photoshop professional editing தேவைகளுக்கு வெளியாகிறது. இதன் அளவு பெரிதாக இருப்பதோடு , இதன் விலை அனைவருக்கும் இது கிடைப்பதை தடை செய்கிறது. இப்போது Photoshop க்கு போட்டியாக பல மென்பொருட்கள் இலவசமாக கிடைக்கின்றன. எவ்வாறாயினும் இவற்றில் பலவற்றின் வடிவமைப்பு Photoshop போல இல்லை. அத்துடன், இதன் செயற்பாடுகளும் அவ்வளவு திருப்பதியாக இல்லை. இலவசமாக கிடைக்கும் Photoshop இனை வடிவத்திலும் செய்யற்பாட்டிலும் ஒத்த முன்னணி 5மென்பொருட்களை இப்போது காண்க.
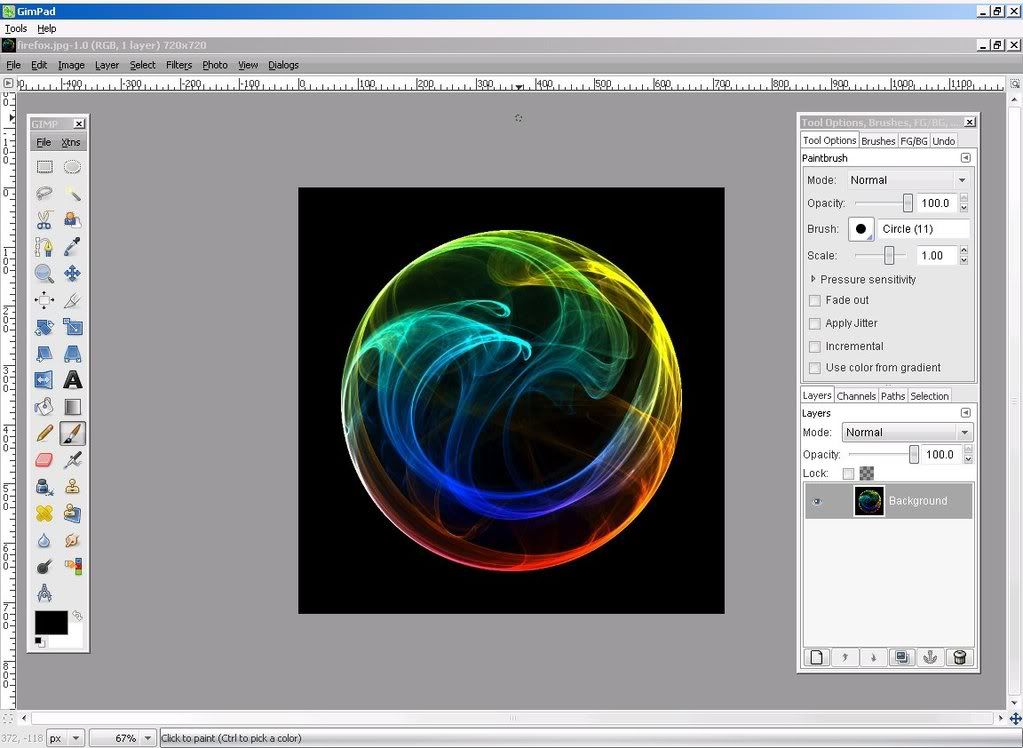
GIMP

Photoshop க்கு அடுத்ததாக அனைவராலும் அறியப்பட்ட ஒன்று. ஓரளவு Photoshop இன் இடை முகத்தை கொண்ட மென்பொருள். மிகப்பெரும் tools box இதில் சிறப்பானது. painting , colour correction, cloning, selection என அனைத்துக்கும் ஏற்றது.
Home Page: www.gimp.org
Download: Cloud or Direct
Price: Free
Platform: Linux, Windows, Mac
Paint.net

அவ்வளவாக பிரபலம் அடையாத இதில் ஏராளமான வசதிகள் உண்டு. மிகச்சிறிய அளவில் உள்ளது இதன் மற்றுமொரு சிறப்பு. சிறப்பான selection tools, curves மூலமான கட்டுப்பாடுகள் போன்வை photoshop இல் உள்ளதை போன்ற வசதிகள் ஆகும்.
Home Page: www.getpaint.net
Download: Cloud or Direct
Price: Free
Platform: Windows
Inkscape

மேலே உள்ளவற்றை விட சிறப்பானது. Scalable Vector Graphics (SVG) முறையில் சேமிக்க உதவுதல் இதன் சிறப்பம்சம். CorelDraw வின் தன்மைகளை ஒத்தது.
Home Page: inkscape.org
Download: Cloud or Direct
Price: Free
Platform: Linux, Windows, Mac
Gimphoto
தொழில்நுட்ப ரீதியில் ஏராளமான வசதிகளை கொண்ட இம் மென்பொருள் சற்று பழையது. இதன் update நீண்ட காலமாக வரவில்லை. Desktop color picker
Enhanced text tool, Dynamic brushes போன்றவை சிறப்பானவை.
Home Page: gimphoto.com
Download: Cloud or Direct
Price: Free
Platform: Linux, Windows, Mac
Wednesday, January 9, 2013
டிரைவர் மக்ஸ்
DRIVER MAX
Hi, here you can get all your driver to get updated by just selecting the following link
after installing the windows install the downloaded software. It will check for suitable driver and helps you to update them..
check the link try the software then post your comment if you like it!!
DRIVERMAX
DriverMax is fully compatible with all service packs and all editions of the following operating systems:
- Windows 8 32-bit and 64-bit, all editions and service packs
- Windows 7 32-bit and 64-bit, all editions and service packs
- Windows Vista 32-bit and 64-bit, all editions and service packs
- Windows XP 32-bit and 64-bit, all editions and service packs
How To Safely Uninstall உபுண்டு From A விண்டோஸ் Dual-பூட் PC
Linux is a great operating system and more often than not, it’s the installation of Linux that is the matter of discussion.
For a change, I will be talking about how to uninstall Linux Ubuntu (or other operating systems) from a dual boot windows pc, and still being able to boot into other OS without much work. So let’s get started right away.
 Backup your Linux files
It pops up
everytime, but backup really is very important. If you have been using
your Linux system for some time, chances are you would have created
files you wouldn’t want to loose. In such a case, you can boot into
Linux, backup your files (check out your Home directory) on an external
device or onto a Windows partition.Alternatively if you somehow managed to mess up and can’t boot into Linux, you can use ext2 IFS which allows you access to your Linux paritions. It can only read ext2 and ext3 filesystems though. If you are using other filesystems, you would have to look around a bit for a similar application. In any case, you can always boot from a Linux live CD to backup files if everything else fails.
Delete Linux Partitions
Next step: delete every Linux partition. That would include everything – boot, swap, home, whatever way you set up your system, it is time to delete all Linux partitions. There are a couple of ways to achieve this, easiest being from within Windows’ Computer Management.You need to:

- Log in to an account with administrative privileges.
- Right click on My Computer, click ‘Manage’.
- Choose ‘Disk Management’ listed under ‘Storage’ and you will see all of your partitions listed there.

Restore MBR
As we noted, GRUB is gone and so is the ability to boot into Windows. You would now need to boot from the Windows CD/DVD to restore the Master Boot Record. You can also use other Live CDs like one of my absolute favorites and highly recommended HBCD just in case you don’t have Windows installation media handy. Here are the steps:- Boot from Windows CD/DVD and choose “Repair” when it shows up.

- Choose command prompt on the resulting screen and run the following two commands:
- bootrec /fixmbr
- bootrec /fixboot
Reclaim free space
Restart now, remove the CD and you should be able to boot into your Windows installation. Once there, you should go ahead and reclaim the unpartitioned free space which was previously occupied by Linux. Doing so is simple and straight forward:- Fire up Disk Management as before.
- Right-click on the unparitioned space, choose new partition or new logical drive.
- Specify the size and other options according to your needs and you are done.
ஸ்மார்ட்போன்களுக்கு உபுண்டு இயங்குதளம்
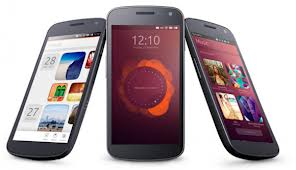 ஆண்ட்ராய்டு ஸ்மார்ட் போன்களில் செயல்படக்கூடிய உபுண்டு இயங்குதளம் வெளியிடப்பட்டுள்ளது. லினக்ஸ் இயங்குதளத்தை அடிப்படையாகக் கொண்டு உருவாக்கப்பட்ட உபுண்டு இயங்குதளத்தைப் பயன்படுத்துவதன் மூலம், ஸ்மார்ட்போன்கள் முழுமையான கணினி போல செயல்படும்.
ஆண்ட்ராய்டு இயங்குதளத்தில் செயல்படக்கூடிய ஸ்மார்ட்போன்களை, மிக எளிதாக உபுண்டு இயங்குதளத்துக்கு மாற்ற முடியும் என்று இந்த இயங்குதளத்தை வெளியிட்டுள்ள பிரிட்டனைச் சேர்ந்த கனோனிகல் நிறுவனம் தெரிவித்துள்ளது.
சாம்சங் கேலக்ஸி நெக்சஸ் போன்களில் இந்த இயங்குதளம் வெற்றிகரமாகச் சோதனை செய்யப்பட்டுள்ளதாகவும் தெரிவிக்கப்பட்டுள்ளது. ஏற்கெனவே உலகம் முழுவதும் 2 கோடி கணினிகளில் உபுண்டு இயங்குதளம் பயன்படுத்தப்பட்டு வருகிறது. வைரஸ் தாக்குதல்கள் இல்லாததது இந்த இயங்குதளத்தின் சிறப்பம்சமாகும்.
Tuesday, January 8, 2013
கூகிள் 10 அதிசயம் ஆனால் கொஞ்சம் தெரிந்த அம்சங்கள்
Bangalore:
Google has brought with itself a multifaceted, user friendly approach.
From being a search engine to a social network, Google entertains people in every way possible.
Users can have fun simply by watching some of its exciting features.
Most of these features are updated occasionally keeping viewers intact
with time.
Here are some exciting features of the search giant that hold in a bundle of surprises!
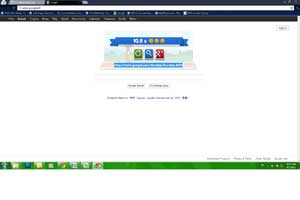
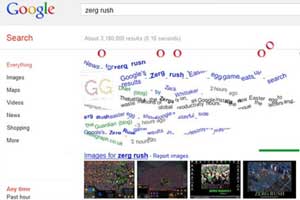 # 10 Zerg Rush
Just punch ‘Zerg Rush’ into the search tab and you will find yourself defending your search results before these zerglings ‘eat them up’. Colored in red and yellow, they try to leave no trace of your results. If you want to eliminate them, just click on them repeatedly. This will save your search engine results completely.
You will also find Google keeping a score. On the right side of the screen, a widget shows the number of enemies you killed along with the number of clicks you used to kill them. If you are unsuccessful at this, your results are wiped out by the yellow and red colored Os, assembling to form a ‘GG’. You can either share your scores within your Google + circles or clear the game to go to the search results.
 # 9 Fighter Jet
If you want to explore the globe, try it here, Google Earth has an amazing feature called Flight Simulator. You can enjoy a flight simulation on your computer screen by simply activating this feature. Just go to the Tools menu, followed by ‘Enter Flight Simulator’.
You can choose your aircraft model and starting position upon starting the simulator. If your system supports the joystick, you can even enable hardware for the flight.
 # 8 Pac Man
Though holding an outdated status in the days of HD games, you can still find Pac Man by just hitting Google. On the 30th anniversary of the game, the search giant made an interactive doodle allowing users to play the game using their keyboards.

# 7 Barrel Roll
The ‘Barrel Roll effect,’ which existed from long back, can still be seen on Google. This has served its way to be one of the coolest tricks for internet users. You can enjoy by typing ‘do a barrel roll’. Your whole page will spin 360 degrees once. You can refresh the page to see the effect again and again.
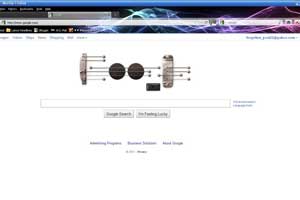 # 6 Guitar
Another interactive doodle called the Guitar was created on the 96th birthday of Les Paul. He was the inventor of solid body electric guitar. The logo was redone in the form of a guitar, where users could play it with the help of a cursor, mouse or keyboard. One could even record tunes and upload them on the web with the help of Google. They could also listen to it anytime and save them as a media file on the computer.
 # 5 Hurdles
Google also made interactive doodles for the London Olympics game, 2012, which are still available in the Doodle archive. The Hurdles is an interesting one, where the runner had to jump over the obstacles. Using the keyboard, he has to race further with increasing level of difficulty. This fun doodle can help you challenge your friends and even set your best score for the results.
 # 4 Moog Synthesizer
In the 1960’s and the 70’s top musicians used the Moog Synthesizer to add depth to their music. On the 78th birthday of Robert Moog, Google created an interactive Moog Synthesizer, which could be played with the help of the keyboard or the mouse.
The doodle displayed features like the mixer, oscillator, filters and envelope where you can simply have fun fiddling with them. You can also record your own music, share it as well as listen to it.
 # 3 Snake
For YouTube lovers, buffering isn’t always acceptable. But in the meantime, Google has this amazing feature for you to play, called the ‘Snake’. The popular game that evolved during the 1970’s can be played by pausing an ongoing or even a buffering video. This is enough by pressing the left, right or down arrow key, immediately followed by the up arrow key. The game can also be played on full screen.
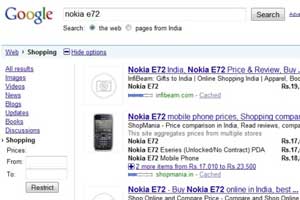 # 2 Price range in search
Google knows what you want simply with a type. This amazing search master can easily be informed and that’s it! You have your results. For users who want to know the range of products and price lists, Google can be used where you type in the name of the product and the Price range of your choice like this’ Product Rs X, Y…’. If you wish to look for Android phones priced between
 15,000 and 20,000, simply type ‘Android Smartphone 10,000…..15,000’.
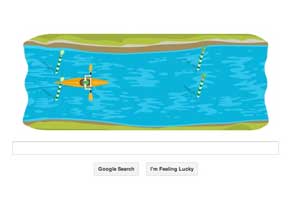 # 1 Slalom Canoe
Another interactive offer by Google is the ‘Slalom Canoe’ of the London Olympics 2012. The game shows a canoe and a rower, which is required to pass through the course in the shortest time possible. With the help of a keyboard, you can control the canoe and avoid all possible obstacles while ensuring that the player passes through the check points.
Friday, January 4, 2013
விண்டோஸ் 8: தந்திரங்களை மற்றும் குறுக்குவழிகள்
Exploring Windows 8 is a like treasure hunting: every so often, you find a hidden gem. Since the operating system launched in October, Windows 8 revealed a wide range of secrets for those curious enough to find them, ranging from quick shortcuts to helpful maintenance tools.
Type and Search
Need to run a search in Windows 8 for a rarely-used application? Just start typing on an open area of the Start Screen. The operating system pulls up search results based on what you typed. Not having to open a search box is a nice timesaver, although if your touch-typing is as bad of mine you might send the system searching for misspelled apps.
Faster Screen Shots
Press Win + Print Screen (Win + Volume down on a tablet) and automatically save screenshot as a PNG file. No more opening Microsoft Paint, pasting and manually saving screenshots.
Win + X: The Best Shortcut Ever
Like many users, I miss the old Windows Start Menu, with its easy access to My Computer, Documents, and Control Panel. While Windows 8 dispenses with the Start button, Microsoft added a lovely little context menu. Simply press the Windows button + X and the menu appears.
How helpful is it? The menu offers access to everything from the Control Panel and Task manger to Computer Management and Network Connections. All told, the Win X menu offers sixteen helpful shortcuts.
The Task Manager Startup Tab
Some programs have an inflated sense of self-worth. During installation programs assume users want it active at all times, so it slips into your list of Start Up Programs. The more programs automatically running when you start up slows down your computer. The redesigned Windows 8 Task Manager includes a Startup tab, listing all programs that open during Startup. You can quickly scan the list, check off any programs you don’t need running and hit the Disable button.
Jump Lists
Taskbar Jump Lists are great shortcuts, but by listing your Recent Items, they raise some privacy concerns. Do you want just anyone gaining easy access to the documents you recently viewed or the videos you watched? Windows 8 allows users to customize Jump Lists by right-clicking the Taskbar and selecting Preferences. In preferences click Properties and then click the Jump Lists tab. You can know control what pops up when you right-click a taskbar icon.
Schedule Auto Maintenance
Windows 8 Schedules maintenance tasks automatically, including software updates, security scans and diagnostics. By default, these tasks run at 3.00 a.m. You can change the maintenance schedule to suit your own needs. From the Control Panel, click Systems and Security and then select the Action Center. Now click Maintenance and then Start Maintenance. From here, you can alter when Windows 8 performs maintenance, and select which maintenance functions you want to run. You can also choose to perform maintenance tasks manually, if you prefer a more hand-on approach.
Relocating Your Recycle Bin
You’d expect to find your Recycle Bin in the left-hand navigation pane, which lists open apps. But no, a quick peek reveals it’s not there. Microsoft decided to keep the navigation pane as simple as possible, so all you’ll see is a list of open apps. Don’t despair. If you want quick access to your Recycle Bin, click the navigation pane’s View option and select Options. You can now select Show All Folders, adding the Recycle Bin to the navigation pane.
விண்டோஸ் 8 USB பூட்டபிள் பெண்ட்ரைவினை உருவாக்க
This post is part of a series of guides we’re doing today related to the recently released Windows 8 Developer Preview. In this guide, you will learn how to install Windows 8 DP from a USB flash drive.
For the uninitiated, a Developer Preview version of Windows 8 was released recently for anyone and everyone to try out. It isn’t the complete version of Windows 8, but provides a nice glimpse at the future of Microsoft’s desktop operating system. Windows 8 Developer Preview is meant for developers to try out, in order to come to grips with how things work in Windows 8, but if you’ve got a spare computer lying around (or have a virtualization-ready processor), you can give it a try without risking much.
The process is quite easy to follow and anyone who has medium level of skill with handling computers will breeze through it.
Step 1: Download and install Microsoft’s Windows 7 USB/DVD Download Tool [Microsoft Store Link]
Step 2: Download Windows 8 Developer Preview from Windows Dev Center. If you don’t know if your processor is 32-bit or 64-bit ready, download the 32-bit .iso file.
Step 3: Insert a USB flash drive having 8GB or greater storage capacity in a USB port on your computer.
Step 4: Launch Windows 7 USB/DVD Download Tool you installed in Step 1.
Step 5: Choose the ISO file you downloaded in Step 2 by clicking on “Browse”.

Step 6: Click on “USB device” when prompted to choose media type. In the next step, choose your inserted USB flash drive.


Step 7: The tool will now create a bootable USB flash drive using the Windows 8 DP .iso. This will take some time, so be patient.

Step 8: Once the tool has done its thing, restart your PC with the USB plugged in. On start up, you will need to enter the BIOS utility of your computer and boot from the USB. Since the procedure for entering BIOS utility is different for different computers, we leave it up to the readers to find out how to do this for their specific computer. (Google might come in handy for this)
Step 9: Once booted from the USB drive; follow on-screen instructions to install Windows 8 DP.
If you followed all the steps correctly, you should be well on your way to installing Windows 8 Developer Preview from USB flash drive. Good luck and have fun using Windows 8!
Subscribe to:
Comments (Atom)