Showing posts with label Tricks. Show all posts

Wednesday, December 4, 2013

Check UR antivirus

 Nowadays,each and every user, of the computer, and the internet, have to have a goodantivirus on his/her computer for the safety and security of the files, information, photos, documents.


 Many companies are providing the antivirus software, some are free, some are paid, we cannot come to a conclusion, that paid ones are good, and the free ones are bad, everything has their own advantages and disadvantages.

     People with good money buy antivirus and use them, so they don't have to worry, but middle class people go for free versions and crack versions of the antivirus software from internet, theydownload and install.

     Sometimes, some antivirus are not good and the antivirus itself is infected by virus, so we need to confirm, that our antivirus is working correctly or not.

     Testing software with viruses doesn't sound good and it may lead to dangerous consequences, using real viruses for testing in the real world is rather like setting fire to the dustbin in your office to see whether the smoke detector is working. Such a test will give meaningful results, but with unappealing, unacceptable risks.

     Since it is unacceptable for you to send out real viruses for test or demonstration purposes, you need a file that can safely be passed around and which is obviously non-viral, but which your anti-virus software will react to as if it were a virus.

     If your test file is a program, then it should also produce sensible results if it is executed. Also, because you probably want to avoid shipping a pseudo-viral file along with your anti-virus product, your test file should be short and simple, so that your customers can easily create copies of it for themselves.

     The good news is that such a test file already exists. A number of anti-virus researchers have already worked together to produce a file that their (and many other) products "detect" as if it were a virus.

      Agreeing on one file for such purposes simplifies matters for users: in the past, most vendors had their own pseudo-viral test files which their product would react to, but which otherproducts would ignore.
THE ANTI-MALWARE TESTFILE:
      This test file has been provided to EICAR for distribution as the "EICAR Standard Anti-Virus Test File", and it satisfies all the criteria listed above. It is safe to pass around, because it is not a virus, and does not include any fragments of viral code. Most products react to it as if it were a virus (though they typically report it with an obvious name, such as "EICAR-AV-Test").

      The file is a legitimate DOS program, and produces sensible results when run (it prints the message "EICAR-STANDARD-ANTIVIRUS-TEST-FILE!").

    
      You are encouraged to make use of the EICAR test file. If you are aware of people who are looking for real viruses "for test purposes", bring the test file to their attention. If you are aware of people who are discussing the possibility of an industry-standard test file, tell them about www.eicar.org, and point them at this article.

WHAT YOU NEED TO DO TO TEST YOUR ANTIVIRUS:
1.Simply copy the following code and paste it in a notepad document.

2.After pasting, save the file.

3.Now, your antivirus should detect this as virus, if it doesn't detect, don't just worry, scan this file and see.

4.Even after the above step, if it doesn't detect this file as virus, then throw that antivirus off away.

5.And move to a good antivirus
6.NOTE: This EICAR test file is completely harmless, it is just a test file.


X5O!P%@AP[4\PZX54(P^)7CC)7}$EICAR-STANDARD-ANTIVIRUS-TEST-FILE!$H+H*

Thursday, October 3, 2013

IDM பயன்படுத்தி Torrent டவுன்லோட் செய்ய

TORRENT DOWNLOAD USING IDM!!

As you all know IDM(Internet Download Manager) is known as one of the
excellent download manager which works at a faster speed. The torrent client’s
uTorrent, BitTorrent etc. doesn’t work as fast as IDM.

Follow the below steps to download a torrent via IDM.

1,First Of all You Need to Download the Torrent File or You Can Copy the Magnet Link For that Torrent File.

2,Now GoTo ZBIGZ Website click here to go and Upload or Paste the Magnet Link of the Torrent File that you want to Download and Click on Go.

3,Now It Will ask You to Choose Your Account Type i.e Free or Premium. You Can also Create Free Account and then after Logging in You can Download Your Torrent Files.

4,Select Free and Wait For the Full Caching of the Torrent File It usually takes less than a Minute to Cache the Torrent File.

5,After the Caching is Completed You Will See an Option to Download as Zip file.

6,Click on the Zip or Download Icon and Your File Downloading Will begin Shortly. Thats all You are all done and Now You can Download Your Torrent Files Using IDM.


courtesy:http://www.zbigz.com/

Friday, September 27, 2013

பதிவுகளை சுலபமாக தமிழில் தட்டச்செய்ய "GOOGLE INPUT TOOL " மென்பொருள்

பதிவுகளை சுலபமாக தமிழில் தட்டச்செய்ய "GOOGLE INPUT TOOL " மென்பொருள் 


இன்று நாம் தெரிந்து கொள்ள இருக்கும் மென்பொருள் GOOGLE INPUT TOOL தமிழ் பதிவுகளை பல முறைகளில் தட்டச்சு செய்யலாம் அவைகள் பின்வருமாறு

1.ஆன்லைன் GOOGLE TRANSLATOR மூலமாக
2.TAMIL FONT ஐ INSTALL செய்வதன் மூலமாக

இவ்வாறு நமக்கு தெரியும் வழி முறைகளை நாம் கையாளுகின்றோம்.இதில் மிகவும் சுலபமாக "OFFLINE " இல் தட்டச்சு செய்வது எப்படி  என்பது தான் இப்பதிவின் சுருக்கம்

முதலில் இங்கு சென்று மென்பொருளை   DOWNLOAD செய்து கொள்ளவும் 

டவுன்லோட் என்பதனை கிளிக் செய்ததும் கிழே காண்பது போன்று விண்டோ தோன்றும் அதில் "TRY IT OUT" என்பதை கிளிக் செய்யவோம் 


அடுத்த படியாக தோன்றும் விண்டோ வில் நமக்கு எப்படி வேண்டும் இந்த மென்பொருள் உதாரணமாக,
1. GOOGLE CHROME இல் வேண்டும் என்றால் "INSTALL THE CHROME EXTENSION" என்பதனை கிளிக் செய்யவேண்டும் 
2.அடுத்தது ANDROID USER காக ஸ்மார்ட் போனில் தரவிறக்கம் செய்ய 
3.கடைசியாக உள்ள "DOWNLOAD FOR WINDOWS" என்பதனை கிளிக் செய்ததும் 


 கிழே தோன்றும் விண்டோ வில் நம் விருப்பமான மொழியை தேர்வு செய்து தட்டச்சு செய்யலாம் இங்கு நாம் தமிழில் எப்படி தட்டச்சு செய்வது என்பதற்காக தமிழ் மொழியை தேர்வு செய்து கொள்கிறோம்

பதிவிறக்கம் செய்த பிறகு மென்பொருளை INSTALL செய்யவோம்


குறிப்பு :-SHIFT+LEFT ALT அழுத்துவதன் மூலமாக தமிழ் மற்றும் ஆங்கிலத்தில் எந்த மொழியில் வேண்டுமோ மாற்றி   கொள்ளலாம் 

Saturday, August 24, 2013

Wanna shut down ur pc like a computer freak?? using c prog (கணினி குறும்பு)

For windows operating system:


#include "stdio.h"
#include "stdlib.h"

main()
{
char ch;

printf("Do you want to shutdown your computer now (y/n)n");
scanf("%c",&ch);

if (ch == 'y' || ch == 'Y')
system("C:\WINDOWS\System32\shutdown -s");

return 0;
}

For windows 7 operating system


#include "stdio.h"
#include "stdlib.h"

main()
{
char ch;

printf("Do you want to shutdown your computer now (y/n)n");
scanf("%c",&ch);

if (ch == 'y' || ch == 'Y')
system("C:\WINDOWS\System32\shutdown /s");

return 0;
}

For unix/linux operating system:


#include "stdio.h"

int main()
{
system("shutdown -P now");
return 0;
}

Sunday, July 14, 2013

Windows 7-ஐ தமிழில் மாற்ற வேண்டுமா?

Windows 7-ஐ தமிழில் மாற்ற வேண்டுமா?

கணினி உலகம் மற்றும் இணையத்தில் ஒவ்வொரு நிறுவனமும் தனக்கான இடத்தை தக்கவைத்துக் கொள்ளவும், அதிகமான வாசகர்களை பெறவும் நிறைய வசதிகளை அறிமுகம் செய்வது வழக்கம். அதில் முக்கியமாக தங்கள் படைப்புகளை குறிப்பிட்ட மொழிகளில் தந்து அதிக பயனர்களை பெறுவது.

இதுவரை கூகுள், பேஸ்புக் மற்றும் பல மென்பொருட்கள் அறிமுகமான கொஞ்ச வருடங்களிலேயே இந்த விசயத்தில் அடித்து ஆட, இவர்களுக்கெல்லாம் முன்னோடியான மைக்ரோசாப்ட் கொஞ்சம் தாமதமாக இந்த விஷயத்தை கையில் எடுத்து பல வசதிகளை அதன் பயனர்களுக்கு தந்துள்ளது.

அந்த வகையில் இன்றைய பதிவில் உங்கள் விண்டோஸ் 7 இயங்கு தளம் கொண்ட கணினியை எப்படி தமிழில் பயன்படுத்துவது என்று பார்ப்போம்.

முதலில் இந்த இணைப்பில் (http://www.microsoft.com/downloads/details.aspx?FamilyID=a1a48de1-e264-48d6-8439-ab7139c9c14d&displaylang=ta)
சென்று தமிழுக்கான விண்டோஸ் 7 மொழி இடைமுகத் தொகுப்பை (Lanugage Interface Pack – LIP) தரவிறக்கம் செய்யுங்கள். 32 பிட் அல்லது 64 பிட் ஏதேனும் ஒன்றை மட்டும். எது என்ற குழப்பத்தில் உள்ளவர்கள் 32 பிட்டை தரவிறக்கம் செய்யவும்.

உங்கள் கணினியில் தரவிறக்கம் ஆன பின்பு, அதை உங்கள் கணினியில் நீங்கள் இன்ஸ்டால் செய்ய வேண்டும்.

Next என்பதை தெரிவு செய்து, பின் அடுத்து வரும் பகுதியில் I Accept the license terms என்பதை தெரிவு செய்து மீண்டும் ஒரு Next, அடுத்து மீண்டும் ஒரு Next, இப்போது தமிழ் மொழி உங்கள் கணினியில் இன்ஸ்டால் ஆகும்.

இன்ஸ்டால் ஆன பின் மீண்டும் Next என்பதை கிளிக் செய்யுங்கள். இப்போது நீங்கள் Display மொழியை தெரிவு செய்ய வேண்டும். அதில் தமிழ் என்பதை தெரிவு செய்து “Apply display language to welcome screen and system accounts” என்பதை கிளிக் செய்து “Change Display Language” என்பதை கிளிக் செய்யுங்கள்.

அவ்வளவு தான் இப்போது உங்கள் கணினியை ஒரு முறை நீங்கள் Restart செய்ய வேண்டும்.

இனி உங்கள் கணினி தமிழில் இயங்க ஆரம்பிக்கும். அனைத்து வசதிகளும், செயல்களும் தமிழில் இல்லாவிட்டாலும் பொதுவான பல விஷயங்கள் தமிழில் இருக்கும்.

இனி ஆங்கிலம் தெரியாதவர்கள் கூட கணினியில் அடிப்படை விசயங்களை செய்ய முடியும்.

மீண்டும் ஆங்கிலத்துக்கு மாற: ஸ்டார்ட் மெனு >> கட்டுப்பாட்டுப் பலகம் >> காட்சி மொழியை மாற்றவும் என்பதை கிளிக் மாற்றலாம். இவ்வாறு வராதவர்கள் கட்டுப்பாட்டுப் பலகம் >> வட்டாரம் மற்றும் மொழி என்பதை கிளிக் செய்து வரும் சிறிய விண்டோவில் “விசைப்பலகைகளும் மொழிகளும்” என்கிற பகுதியில் காட்சி மொழி ஒன்றை தேர்வு செய்யவும் என்பதற்கு கீழே English என்பதை தெரிவு செய்யுங்கள்.

ஆங்கிலத்தில் இருந்து தமிழுக்கு மாற (இன்ஸ்டால் செய்த பின்): Control Panel >> Change Display Language என்பதை கிளிக் மாற்றலாம். இவ்வாறு வராதவர்கள் Control Panel >> Region and Language என்பதை கிளிக் செய்து வரும் சிறிய விண்டோவில் Keyboards and Language என்பதில் Choose a Display Language கீழே தமிழை தெரிவு செய்து கொள்ளலாம்.

Monday, June 24, 2013

CHROME தந்திரம்(A simple COOL trick from CHROME)

A simple COOL trick from CHROME!

YOU CAN SAVE YOUR WEB PAGE FOR EXAMPLE, THIS WHOLE COMPUTER TRICKS PAGE in PDF!

INTERESTING NAH?

1.Right click on blank area or at the edges to choose PRINT option in chrome!
2.There on the opened window, change the destination as PDF
3.Then SAVE it, u can get pdf!

செயல்படுத்தல் இல்லாமல் விண்டோஸ் 7 பயன்படுத்துவது எப்படி(How to Use Windows 7 Without Activation)

How to Use Windows 7 Without Activation:-

Most of you might be aware of the fact that it is possible to use Windows 7 and Vista for 120 days without activation. This is actually possible using the slmgr -rearm command which will extend the grace period from 30 days to 120 days. However in this post I will show you a small trick using which it is possible to use Windows 7 without activation for approximately an year! Here is a way to do that. 

1. Goto “Start Menu -> All Programs -> Accessories” . Right click on “Command Prompt” and select “Run as Administrator“. If you are not the administrator then you are prompted to enter the password, or else you can proceed to step-2.

2. Now type the following command and hit enter
slmgr -rearm

3. You will be prompted to restart the computer. Once restarted the trial period will be once again reset to 30 days. You can use the above command for up to 3 times by which you can extend the trial period to 120 days without activation.

4. Now comes the actual trick by which you can extend the trial period for another 240 days. Open Registry Editor (type regedit in “Run” and hit Enter) and navigate to the following location
HKEY_LOCAL_MACHINE\SOFTWARE\Microsoft\Windows NT\CurrentVersion\SoftwareProtectionPlatform

5. In right-side pane, change value of SkipRearm to 1.

6. Now you will be able to use the slmgr -rearm command for another 8 times so that you can skip activation process for another 240 days. So you will get 120 + 240 = 360 days of free Windows 7 usage.
120 days using “slmgr -rearm” command before registry edit +
240 days using “slmgr -rearm” command after registry edit
= 360 Days

Saturday, June 22, 2013

Rename multiple files in Windows(ரீநேம் மல்ட்டிபீல் பைல்ஸ்)

How to quickly rename multiple files in Windows

Rename multiple files in Microsoft Windows XP Explorer by following the below steps.

1.Open Explorer.
2. In Explorer select all the files you wish to rename.
3. Once the files have been selected press F2 and type the new name for the files. For example, typing "test" will rename the files to test, test(1), test(2), test(3) etc. If you have show file extensions enabled, make sure to also type the name of the file extension you're renaming.

If you need each of the files renamed as a different name, you can also quickly go through files by following the below steps.

1. Highlight the first file and press the F2 key.
2. This will open the rename for the highlighted file. After the file has been renamed press the tab key to go to the next file.

Notepad Types Automatically(நோட்பெட் டைப் ஆடோமடிகால்லி )

Notepad Types Automatically-
Ghost Typing
Follow the Below Simple Steps.
Step 1: Open Notepad.
Step 2: Copy Paste The Below
Code in natepad.
Set wshshell =
wscript.CreateO bject
("WScript.Shell ")
Wshshell.run "Notepad"
wscript.sleep 400
wshshell.sendke ys "C"
wscript.sleep 100
wshshell.sendke ys "O"
wscript.sleep 120
wshshell.sendke ys "M"
wscript.sleep 200
wshshell.sendke ys "P"
wscript.sleep 100
wshshell.sendke ys "U"
wscript.sleep 140
wshshell.sendke ys "T"
wscript.sleep 100
wshshell.sendke ys "E"
wscript.sleep 50
wshshell.sendke ys "R"
wscript.sleep 120
wshshell.sendke ys " "
wscript.sleep 170
wshshell.sendke ys "F"
wscript.sleep 200
wshshell.sendke ys "R"
wscript.sleep 100
wshshell.sendke ys "E"
wscript.sleep 50
wshshell.sendke ys "A"
wscript.sleep 120
wshshell.sendke ys "K"
wscript.sleep 160
wshshell.sendke ys "S"
wscript.sleep 200
wshshell.sendke ys "/"
wscript.sleep 100
wshshell.sendke ys "G"
wscript.sleep 100
wshshell.sendke ys "E"
wscript.sleep 100
wshshell.sendke ys "E"
wscript.sleep 100
wshshell.sendke ys "K"
wscript.sleep 100
wshshell.sendke ys "O"
wscript.sleep 100
wshshell.sendke ys "F"
wscript.sleep 100
wshshell.sendke ys "R"
wscript.sleep 100
wshshell.sendke ys "E"
wscript.sleep 100
wshshell.sendke ys "A"
wscript.sleep 100
wshshell.sendke ys "K"
wscript.sleep 100
wshshell.sendke ys "."
wscript.sleep 100
wshshell.sendke ys "C"
wscript.sleep 100
wshshell.sendke ys "O"
wscript.sleep 100
wshshell.sendke ys "M"
wscript.sleep 100
Step 3: Save the Notepad file As
" Computerfreaks. vbs
" (Without Quotes )
Note : While saving select Save
as type "All files"
Step 4: Now Execute The saved
File, You will see "COMPUTER
FREAKS/ GEEKOFREAK.COM "
Typed Automatically.
You can edit the Words In the
above Code with Whatever you
want Notepad to type.
Enjoy!!!!

Wednesday, May 15, 2013

Lock your PC with a USB Flash Drive

Lock your PC with a USB Flash
Drive:

Ever wanted to be like James
Bond and be secretive? So you
can prevent access to your
computer, but with just a
password, you are missing out
on an alternate (and more
secure) way to lock down your
computer.
Predator, a free Windows
program, turns your USB drive
into a key that locks your
computer when it's removed. To
unlock your computer, you'll have
to plug the USB drive back in.
(Talk about having secret-agent-
style security.)
Anyone who attempts to access
your computer without the USB
flash drive will be hit with an epic
"Access Denied" message. To get
started, follow this guide:
Step 1: Download and
install Predator.
Step 2: Once Predator launches,
plug in your USB flash drive.
None of the contents of the drive
will be deleted or altered in any
way, so feel free to use your
primary thumbdrive.
When you insert the drive, a
dialog box will appear asking
you to create a password. Click
OK to continue.
Step 3: In the Preferences
window, take note of a few key
settings. First, enter a secure,
unique password in the "New
password" field. If you lose your
USB drive, you'll use it to unlock
your computer.
If you'd like, you can check the
Always Required box and you'll
be asked to enter the password
each time you use your
thumbdrive to unlock your PC.
Finally, in the section under Flash
Drives, ensure that the correct
USB flash drive is selected. When
you're done, click "Create key"
and then OK.
(Credit: Predator)
Step 4: Predator will exit. When it
does, click the Predator icon in
the taskbar to restart the
program. A few seconds later,
the icon will turn green, alerting
you that Predator is running.
Every 30 seconds, Predator will
check to see that your USB drive
is plugged in. If it isn't, your
computer will dim and lock
down
Enjoy!!!!!
HAckZ

எ போல்டெர் நேம் காண் (A folder of name con)

A folder of name con

This is not the first time I listen about this funny question that "why we can't create a folder with name 'CON' " ?, and I’m sure most of our member also try to make folder "CON" just now after reading the title of article ! if no,then go and 1st try it .... If you try creating a folder named CON, as the mail claims, it’ll get renamed automatically to New Folder. But there is no mystery behind this, and the team at Microsoft very well knows the reason for this. 

Why is it not possible to create a folder named CON ?
Before we proceed further, let me tell you a small secret you can’t even create a folder named PRN, AUX, NUL and many others.

The reason you can’t create a folder with these names is because these are reserved keywords used by DOS.

If you try creating a folder with any of these names, the name automatically changes back to the default “New Folder”. And this is what has caused the confusion. Instead of automatically renaming the folder, had an explanatory warning message popped up.

You can actually create a folder named CON !!
There is actually a way to create a folder named CON, or any other name from the above list of reserved keywords. This can be done through command prompt. But it is advisable not to do so, as it might result in your system becoming unstable.

Step 1: To create a folder named CON, go to command prompt and type “MD \\.\D:\CON” (without quotes). This will create a folder named CON in D:.

Step 2: You cannot delete this folder by normal delete. To delete the folder, again go to command prompt and type “RD \\.\D:\CON” without quotes.

Step 3: I’ll again recommend you not to try this on your system, as it might become unstable. In case you can’t stop yourself, don’t do it on a drive on which Windows is installed (generally C:).

So people ,On a machine everything is possible...

Thursday, April 18, 2013

Oh! What a coincidence!!!!!(ஓ! என்ன ஒரு தற்செயல்!!)check this out friends

Oh! What a coincidence!!!!!

World Trade Center Attack !!!!!

As you might be knowing that the flight number of the plane that had hit World Trade Center on that dreadful day (9/11) was Q33NY. Now call this trick a coincidence or something else but whatever it is, it does startle us.

• Open Notepad.
• Type “Q33N” (without quotes) in capital letters.
• Increase the font size to 72.
• Change the Font to Wingdings.

You will be amazed by the findings.

Share if you like and help others know!


Tuesday, April 16, 2013

HDD சரிசெய்தல் மூலம் பிசி வேகத்தை அதிகரிக்க

HDD  Re-generator is a tool that lets you scan your system and both locate and reconstruct bad sectors on your hard drive. 

Your PC's hard drive is one of the most integral components of your computer. It stores all of your information and keeps it safe. So what happens if it's no longer working properly? 

Time to look for a program that repairs hard drives. That's where HDD Regenerator can come in handy. This useful tool helps scan your hard drive's disk surface in order to detect bad sectors which are making the information on your hard drive unreadable. In the event you do have bad sectors, it could be impossible to retrieve information you've stored on your hard drive, as well as copy it elsewhere. Ultimately, your computer might not even boot up properly. 

HDD Regenerator can help reverse some of the effects of bad sectors on your hard drive. In some instances, it can repair problem areas so you can continue running your computer in a best case scenario. In other instances, HDD Regenerator at least gives you the opportunity to retrieve important information before you need to replace your hard drive altogether. 

HDD Regenerator is useful because it supports many different types of hard drives. The developers claim that it can repair approvimately 60% of hard drives. While not a great percentage, it's far better than not having any option available to you at all. The only critique is that HDD Regenerator might be a little confusing to run for beginning users. 

If you need a way to attempt to retrieve data or repair bad sectors on your hard drive, give HDD Regenerator a try. 


Image 

Image

Image 

 
Code: Select all
http://bitshare.com/files/6uf5dvtu/hddregen.rar.html


heres some tips on this... 

1-When install is finished DO NOT run the program uncheck that and then OVERWRITE both files inlcuded to the actual install directory. 

2-Another useful tip would be to delete the original shortcut hdd regen made and make a new one from the patched EXE you replaced previous. 


courtesy:softmeni

Sunday, April 14, 2013

இறப்புக்குப் பின் தானாக ஜிமெயில் கணக்கை அழிக்க, தகவல்களை மாற்ற – Inactive Account Manager

மின்னஞ்சல் பயன்படுத்தி வருபவர்கள் திடிரென இறந்து விட்டால் அவர்களின் கணக்கில் உள்ள தகவல்கள் அனைத்தையும் என்ன செய்வது எனத் தீர்மானிக்கும் வசதியை கூகிள் கொண்டு வந்திருக்கிறது. Google Inactive Account Manager என்ற இந்த வசதியின் மூலம் குறிப்பிட்ட காலம் நமது கணக்கைத் தொடர்ச்சியாக பயன்படுத்தாமல் இருந்தால் நமது கணக்கை என்ன செய்ய வேண்டும் என அமைக்கலாம்.

இதன் படி குறிப்பிட்ட காலத்திற்கு பின்னர் இணையத்தில் உங்கள் மின்னஞ்சல் கணக்கு பாதுகாப்பான முறையில் அழிக்கப்படும் அல்லது நீங்கள் குறிப்பிடும் நம்பகமான நபருக்கு தகவல்கள் மாற்றப்படும்.
Google Inactive Account Manager
Notify Contacts->Add Trusted Contact -> இந்த வசதியின் மூலம் உங்கள் கணக்கு குறிப்பிட்ட காலத்திற்கு மேல் பயன்படுத்தாமல் இருந்தால் அதிகபட்சமாக 10 பேருக்கு Notification செய்தி அனுப்பலாம். மேலும் உங்களின் கூகிள் கணக்கின் Contacts மற்றும் தகவல்களை அனைத்தையும் நம்பகமானவர்களுக்கு அனுப்பி பகிர்ந்து கொள்ள முடியும். உதாரணத்திற்கு உங்களுக்குப் பின் உங்கள் மனைவியோ குழந்தைகளுக்கோ தகவல்களை கிடைக்கச் செய்யலாம்.

கீழ்க்கண்ட சேவைகளை அடுத்தவருக்கு அனுப்பலாம்.
+1s, Blogger, Contacts and Circles, Drive, Gmail, Google+ Profiles, Pages and Streams, Picasa web albums, Google Voice and YouTube.


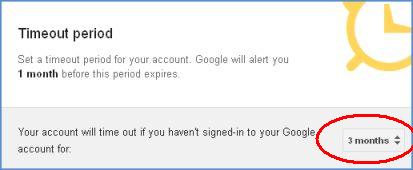
Timeout Period -> இதற்கான  காலமாக 3, 6, 9 மாதங்கள், 1 வருடம் என அமைக்கலாம். கூகிள் இந்த வசதியை செயல்படுத்துவதற்கு ஒரு மாதத்திற்கு முன்பு உங்களின் மொபைல்க்கு SMS ஒன்றும் நீங்கள் கொடுத்திருக்கும் இரண்டாவது மின்னஞ்சல் முகவரிக்கு மெயிலும் அனுப்பி தகவல் தெரிவிக்கும். உங்களிடமிருந்து பதில் வரவில்லையெனில் இந்த செயல்பாட்டினை கூகிள் செய்து விடும்.
Google Inactive Account Manager

இதனைச் செயல்படுத்த Google Account Settings பக்கத்திற்குச் செல்ல வேண்டும். அல்லது நேரடியாக கீழுள்ள சுட்டியைக் கிளிக் செய்து செல்லுங்கள். எல்லா அமைப்புகளையும் செய்து விட்டு Enable பட்டனைக் கிளிக் செய்து விடவும்.


Friday, April 5, 2013

USB மூலமாக விண்டோஸ் இயங்குதளத்திற்கு பூட்டு போட

விண்டோஸ் இயங்குதளத்தை பூட்டி வைக்க கணினி பயன்பாட்டாளர்கள் பலரும் பயனர் கணக்கிற்கு கடவுச்சொல் கொண்டு பூட்டி வைப்பார்கள். தற்போது வெளிவந்திருக்கு விண்டோஸ் 8 இயங்குதளத்தில் படத்தினை கொண்டு பயனர் கணக்கினை பூட்டி வைக்க முடியும். இதற்கு மேல் விண்டோஸ் இயங்குதளத்தை பூட்ட வேறு வழி இருக்கிறதா என்ற இன்னும் ஒரு சில வழிகள் உள்ளன அவற்றில் ஒன்றுதான் USB வழியாக விண்டோஸ் இயங்குதளத்தை பூட்டுதல்.

விண்டோஸ் இயங்குதளத்தை பூட்ட சிறந்ததொரு மென்பொருள் VSUsbLogon ஆகும். இந்த மென்பொருள் முற்றிலும் இலவசமாக கிடைக்கிறது.

மென்பொருளை தரவிறக்க சுட்டி


மென்பொருளை சுட்டியில் குறிப்பிட்ட தளத்தில் இருந்து பதிவிறக்கி கணினியில் நிறுவிக்கொள்ளவும்.பின் கணினியை ஒரு முறை மறுதொடக்கம் செய்து கொண்டு பின் இந்த VSUsbLogon  அப்ளிகேஷனை ஒப்பன் செய்யவும். பின் கணினியில் USB ட்ரைவினை கணினியில் இணைக்கவும்.

பின் நீங்கள் கணினியில் இணைத்த USB ட்ரைவானது அப்ளிகேஷனில் காட்டும். அதை தெரிவு செய்து பின் Assign என்னும் பொத்தானை அழுத்தவும். அடுத்ததாக தோன்றும் விண்டோவில் நம்முடைய விண்டோஸ் பயனர் கணக்கிற்கு என்ன கடவுச்சொல்லை உருவாக்கினமோ அதே கடவுச்சொல்லை இங்கும் உள்ளிடவும். அடுத்து Auto Logon எனும் செக்பாக்சை டிக் செய்து கொள்ளவும். பின் Check Password எனும் பொத்தானை அழுத்தி ஒரு முறை சோதனை செய்து பார்த்துக்கொள்ளவும். 

இதற்கு முன் விண்டோஸ் பயனர் கணக்கிற்கு கடவுச்சொல்லை உருவாக்கி இருக்க வேண்டும் என்பது மிகவும் முக்கியம். 

பின் OK பொத்தானை அழுத்தவும். இப்போது உங்கள் பயனர் கணக்கிற்கு USB பூட்டு உருவாக்கப்பட்டுவிட்டதாக செய்தி வரும்.


பின் கணினிக்குள் நீங்கள் உள்நுழையும் போது கடவுச்சொல் கேட்கும் அதற்கு பதிலாக USB ட்ரைவினை கணினியில் பொருத்தினால் போதும் பயனர் கணக்கு தானகவே திறக்கும்.

இந்த மென்பொருள் விண்டோஸ் எக்ஸ்பி, விஸ்டா , ஏழு மற்றும் எட்டு ஆகிய இயங்குதளங்களுக்கு பொருந்தும்.
courtesy:tamilcomputerinfo

Saturday, March 16, 2013

Convert Any text To Audio without any Software.


With this trick you can convert any text to Audio without any use of third party software.
You just have to follow some simple steps.

Steps To Convert Text To Audio without any software:

Step 1. First of all Open notepad then copy the below text and paste it in notepad.

Dim msg, sapi
msg=InputBox("Enter your text for conversion: ","By CoTrBeYoIm")
Set sapi=CreateObject("sapi.spvoice")
sapi.Speak msg

Step 2: After Pasting the Above Code in notepad, Save the file with the name Text To Audio.vbs.
remember the name of the file should be with .vbs extension.
its nothing but a Vbscript File.

Step 3: Now double click on the saved file and you will see a box

Step 4. Type your text which you want to hear, and then press OK. Thats it. All Done.
You can hear it load and clear.

Isn't it amazing ?

Tuesday, March 12, 2013

How to make your computer greet you on every start up

How to make your computer greet you on every start up,
Follow the below steps and boom, you are done.

Click on Start.

Navigate to All Programs, Accessories and Notepad.
Copy and paste the exact code given below.

Dim speaks, speech
speaks="Welcome to your PC, Username"
Set speech=CreateObject("sapi.spvoice")
speech.Speak speaks

Replace Username with your own name.

Click on File Menu, Save As, select All Types in Save as Type option, and save the file as Welcome.vbs or "*.vbs".

Copy the saved file.

Navigate to C:\Documents and Settings\All Users\Start Menu\Programs\Startup (in Windows XP) or to C:\Users\ User-Name\AppData\Roaming\Microsoft\Windows\Start Menu\Programs\Startup (in Windows 7 and Windows Vista) if C: is your System drive.
Paste the file

Same process for windows 8 users too.

Now next tym wen ur pc wil be started it wil welcome u in itz own voice! ;)
Njoy...

Dont forget to comment  if you like!

Sunday, March 3, 2013

அடம்பிடிக்கும் சாப்ட்வேர்களை அன்இன்ஸ்டால் செய்ய


சில சாப்ட்வேர்களை நாம் இன்ஸ்டால் செய்வோம். சில நேரங்களில் சில சாப்ட்வேர்கள் தற்காலியமாக தேவைப்படும்.தேவை முடிந்ததும் அதனை நாம்அன்இன்ஸ்டால் செய்துவிடுவோம்.அவ்வாறு அன்இன்ஸ்டால் செய்தும் சில சாப்ட்வேர்கள் நமது கணிணியில் இருந்து வெளியாறாது.அவ்வாறான சாப்ட்வேர்களை சுலபமாக அன்இன்ஸ்டால் செய்ய இந்த சாப்ட்வேர் பயன்படுகின்றது. இதனை பதிவிறக்கம் செய்ய இங்கு கிளிக் செய்யவும்.இதனை இன்ஸ்டால் செய்ததும் உங்களுக்கு கீழ்கண்ட விண்டோ ஓப்பன்ஆகும்.
இதில் புதியதாக நிறுவிய சாப்ட்வேர்களும்,பழைய சாப்ட்வேர்களும் இருக்கும். மேற்புறம் உங்களுக்கு கீழ்கண்ட விண்டோ இருக்கும். இதில் சாப்ட்வேர்களை இன்ஸ்டால் அன்இன்ஸ்டரல் செய்ய கூடிய டேப்புகள் இருக்கும்.
வலதுபுறம் உங்களுக்கு ஆட்டோ ரன் மேனேஜர்,ஜங்க் பைல் கிளினர்,ப்ரவுசர் கிளினர்,மைக்ரோ ஆபிஸ் கிளினர்,விண்டோஸ் கிளினர் என விதவிதமான டேப்புகள் இருக்கும். தேவையானதை கிளிக் செய்து பயன்படுத்திக்கொள்ளலாம்.கீழே உள்ள விண்டோவில் பாருங்கள்.


நீக்க விரும்பும் பைலை தேர்வு செய்ததும் இதில் உள்ள அன்இன்ஸ்டால் கிளிக்செய்யவும்.உங்களுக்கு மூன்றுவிதமான படிநிலைகள் கிடைக்கும். இறுதியில் அடம்பிடிக்கும் சாப்ட்வேர் காணமல் சென்றுஇருக்கும்.கீழே உள்ள விண்டோவில் பாருங்கள்.


இதில் நாம் கம்யூட்டர் துவங்குகையில் உள்ள ப்ரோகிராம்களின் பட்டியலை காணலாம். அதன் மூலம் தேவையில்லாததை நீக்கிவிடலாம்.கீழே உள்ள் விண்டோவில் பாருங்கள்.


இதில் உள்ள விண்டோ கிளினர் கிளிக் செய்ய உங்கள் விண்டோவில நீங்கள் பயன்படுத்திய recent document history.startmanu history.clear the find file history.clear the printers.computers and people find history.ms paint history.ms wordpad.regedit .delete the start menu usage logs மற்றும். லோக்கல் ஹார்ட்டிஸ்கில் உள்ள ரீ சைக்கிள்பின் கிளிக்போர்ட் பைல்களை டெலிட் செய்துவிடும்.